WDS Server
-----------
Windows Deployment Services (WDS) enables you to deploy Windows operating systems over the network, which means that you do not have to install each operating system directly from a CD or DVD.
Benefits of WDS Server:-
------------------------
Allows network-based installation of Windows operating systems, which reduces the complexity and cost when compared to manual installations.
Supports deploying images for mixed environments including Windows 7and Windows Server 2008 R2 through Windows 8.1and Windows Server 2012 R2.
Uses standard Windows Setup technologies including Windows Preinstallation Environment (Windows PE), .wim files, and image-based setup.
Transmits data and images by using multicast functionality.
Allows you to create images of a reference computer using the Image Capture Wizard, which is an alternative to the ImageX tool.
Allows you to add driver packages to the server and configure them to be deployed to client computers along with the install image.
Prerequisites for installing Windows Deployment Services:-
----------------------------------------------------------
- Active Directory Domain Services (AD DS). A Windows Deployment Services server must be a member of an Active Directory Domain Services (AD DS) domain or a domain controller for an AD DS domain.
- DHCP. You must have a working Dynamic Host Configuration Protocol (DHCP) server with an active scope on the network because Windows Deployment Services uses PXE, which relies on DHCP for IP addressing.
- DNS. You must have a working Domain Name System (DNS) server on the network before you can run Windows Deployment Services.
- NTFS volume. The server running Windows Deployment Services requires an NTFS file system volume for the image store.
- Credentials. To install the role, you must be a member of the Local Administrators group on the server.
LAB Requirement:-
-----------------
$ One DC server_(mainserver.opensource.com) ADDS
$ DNS Server
$ DHCP Server with one active scope
$ One client machine without Operating System
Step-1) Open Server Manager and then on the Dashboard click Add Roles and Features.
.png)
Step-2) In the Add Roles and Features Wizard box, click Next.
.png)
Step-3) On the Select installation type page, verify that you choose Role-Based or feature-based installation then click Next.
.png)
Step-4) Now select desired server you’d like to install Windows Deployment Services on.
.png)
.png)
.png)
Step-6) On the Select features box, click Next.
.png)
Step-7) On the WDS box, review the information presented, and then proceed with Next.
.png)
Step-8) On the Select role services box, click Next.
.png)
Step-9) On the Confirm installation selections box, click Install.
.png)
Step-10) Once installation of WDS successful, just click Close.
.png)
.png)
Step-12) On the Windows Deployment Services console, double click Servers, then right-click mainserver.opensource.local, and then click Configure Server.
.png)
.png)
Step-14) On the Install Options page, verify that you choose Integrated with Active Directory and then click Next.
.png)
Step-15) On the Remote Installation Folder Location page, you can accept the default location which is C:\RemoteInstall and then click Next.
.png)
Step-16) On the System Volume Warning dialog box, click Yes.
.png)
Step-17) Next, on the PXE Server Initial Settings box, click Respond to all client computers (known and unknown), and then click Next, please wait for few second for the process to complete.
.png)
Step-18) Next, on the Operation Complete box, please clear the Add images to the server now check box, and then click Finish.
.png)
Step-19) Before we proceed, please make sure that you already insert your Windows 10, either DVD and ISO format if you are using virtualization platform.
.png)
Step-20) Our next step is to add a boot image into WDS console, so in Windows Deployment Services console, double click mainserver.opensource.local and then right-click Boot Images, and then click Add Boot Image.
On the Add Image Wizard, on the Image File page, click Browse, then in Select Windows Image File box, double-click DVD Drive (F:), double-click sources folder, and then double-click boot.wim.
.png)
Step-21) On the Image File box, verify the File Location which is F:\sources\boot.wimand then click Next.
.png)
.png)
Step-23) On the Summary box, click Next.
.png)
Step-24) On the Task Progress page, click Finish.
.png)
Step-25) Once you successfully completed add a boot image into WDS, next you need to add an install image into WDS, so in the WDS console, right-click Install Images, and then click Add Image Group.
.png)
Step-26) In the Add Image Group box, type Windows 10, and then click OK.
.png)
Step-27) Next, on the WDS console, right-click Windows Server 2016, and then click Add Install Image.
.png)
Step-28) In the Add Image Wizard box, browse to F:\sources\install.wim then click Next.
.png)
Step-29) On the Available Images box, select Windows 10 Education, and then click Next to proceed.
.png)
Step-30) On the Summary box, click Next and wait for few minutes for the process to be completed.
.png)
.png)
Step-32) In WDS, right-click mainserver.opensource.local, and then click Properties. \
.png)
Step-33) Click the PXE Response tab, and then Select the Require administrator approval for unknown computers check box. On the PXE Response Delay, I choose 28 seconds, and then click OK.
.png)


Step-35) Click on "Next" option thereafter verify the domain user authentication.


Step-36) Select Windows 10 version & click on Next option.

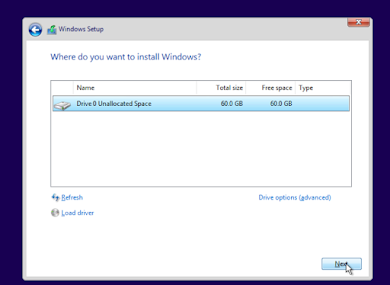
Step-37) Select Hard disk where you want to install operating system & select Next.
Step-38) Installation is started after complete the installation you must follow the installation step for example create user id & password. thereafter operating system will be install.


No comments:
Post a Comment